
 Every time I switch from Cornwall to Turkey, and vice versa, I give away my sourdough starter to other bread-making friends and neighbours, then begin a new one when I get to the other end. However, when we went back to Turkey last September, and having managed to produce a particularly potent batch, I decided to take some with me. Unfortunately, despite being in a sealed plastic pot inside two zip-lock freezer bags, it sort of exploded while in the hold of the plane, and then got out into my suitcase. Ooops. This was not ideal, as we had a two-day stopover in Göcek on our way back to Kaş, so I had to sit and pick lots of little concrete-like blobs of dough off the least-affected garments, so that I had something to wear. The other slightly unexpected outcome was that all of my clothes had a vague whiff of a brewery about them. Oh dear.
Ergo I decided NOT to risk bringing any starter back with me to Cornwall, so have spent the last few weeks lovingly cultivating a new batch (for which, read: I bunged a bit of flour and water in a jar and then fed it with more flour and water for a few days – nothing at all complicated or mysterious).
In our local bakery, a small sourdough loaf is £3.20 – and, to be honest, it’s not even that marvellous – it is mostly crust with not much going on inside, and you could probably use it as a footstool. Mine costs 33.3p per loaf, plus a couple of pennies for the starter, and it is both man-sized and totally delicious. It does take a little time and you do need patience, but the actual hands-on bit takes only a few minutes. The bread is best risen overnight in a cool place (in our case, the conservatory), then baked in the morning, so I normally start mine around lunchtime. If you are an early bird, you could of course start it first thing in the morning and bake it in the late afternoon or evening. There is no fixed time for the rising – it takes as long as it takes. Bread made with a sourdough starter uses only the natural yeasts from the flour and water, so it will not rise quickly like dough made with commercial fast-action yeast or fresh baker’s yeast.
My advice is to make your first loaf or two when you are going to be at home anyway, and have no fixed timescale or social commitment in mind – once you’ve got a better idea of how the dough behaves in your environment, you will be able to make a reasonably accurate judgement as to how long it will take. Obviously you don’t need to be glued to the house the entire time, you can leave it to do its own thing while you get on with your day.
In the summer, I have been known to put the dough in the fridge overnight for its last rise, though this usually means leaving it to rise for a while longer while it comes up to room temperature before baking, to make the dough reach its full potential.
You can buy proving baskets, bakers’ lames and all sorts of paraphernalia to make sourdough bread, but if you have a roasting tin or sturdy ovenproof saucepan with a lid, and a sharp knife (or a razor blade or artist’s scalpel), you’ll still be fine. Although the bread does look beautiful when it has been risen in a ridged basket, I find it easier to do the final rise in the tin in which the bread is going to be baked. It saves faffing around and removes the opportunity to accidentally deflate your dough while you’re trying to manhandle something that is a bit like a giant ball of chewing gum out of a basket and into your tin. It’s also traditional to sprinkle the loaf with rice flour before baking – this gives it a lovely white finish, but ordinary flour is also fine for the job. Professional sourdough bakers across the world are probably recoiling in horror right now, but I think it’s time sourdough bread was demystified a little – it’s only flour and water, after all.
 I use an old-fashioned enamel roasting tin for my sourdough, like this one, which you can buy from most cookware shops or from Amazon. A cast iron casserole also works well, and I’ve even used a stainless steel saucepan when I’ve wanted to bake two at a time (I keep forgetting to buy another tin). I am afraid your tin is likely to get stained during the baking – if this bothers you, you can periodically give it a spruce up with a can of oven cleaner – the kind that nearly rips out the back of your throat if you are careless enough to breathe and spray at the same time, and, in my experience, is apt to make the cats leave home. If you have an oval casserole or roasting tin, you can shape your bread into an oval if your prefer (this makes the slices an easier shape for toasting).
I usually get my starter going for at least a couple of weeks before I use it for my first loaf – however, if you need to pour off some of the starter before you reach that stage (see note below), and you decide you might want to make a loaf of bread instead of discarding it, you can always add a generous pinch of fast-action dried yeast to the recipe below to help the natural yeasts along. You won’t get exactly the same authentic stretchy holey dough, but the flavour will be lovely and you should still get a crisp crunchy crust.
I’ve tried several different recipes, of varying degrees of complication, and have adapted this recipe from the one on Karen Burns-Booth’s lovely blog lavenderandlovage.com. If you’ve not discovered this site, it is the perfect way to pass a few hours, deciding what to cook next. It is a lovely mix of recipes that Karen has collated and created throughout her interesting life, which has spanned South Africa, France, Yorkshire and now Wales. I have even further simplified Karen’s already-straightforward recipe and also re-jigged the liquid ratios a little – I did this by accident the first time, because I cack-handedly poured too much starter into the flour, but then I thought the loaf actually turned out better, so I’ve continued to add slightly more starter and slightly less water. I’ve also found that a teaspoon of sugar in the dough helps to liven up the natural yeasts, especially on cold days. No two loaves ever turn out the same, mind you – it all depends on the flour, the temperature, the humidity and the mood you are in on the day.
To make the starter:
Day 1: In a large jam jar (or similar – I use a big jar that had pickles in it) spoon three tablespoons of strong flour, three tablespoons of water and a pinch of sugar. Stir and balance the lid on top of the jar. Leave at room temperature.
Days 2 – 6: For each of the next five days, feed the starter by adding a further three tablespoons of flour and water (but no more sugar), and giving it a good stir. On the final day, once you have fed the starter, refrigerate it with the lid very loosely done up.
Day 9 or 10: After three to four days have passed, ‘feed’ the starter again, discarding about one third of the mixture before adding the new flour and water (use this, with a little dried yeast, to make a loaf, as detailed above, if you wish). Return to the fridge.
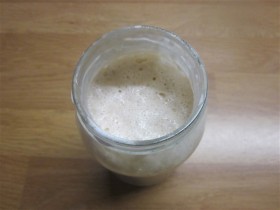 Repeat twice more at three-day intervals. Your starter is now ready to use – return to the fridge unless you want to bake a loaf that day. When you want to make a loaf, remove the starter from the fridge and feed it, then leave for a couple of hours before using. You should see that the starter froths up in the jar once it has been at room temperature for a while. Thereafter, the starter needs to be fed once a week – if you are not using any of it for baking, pour away about a third of the starter before feeding it. If you would prefer to buy a ready-made starter, you can find details at: lavenderandlovage
33p sourdough loaf
*PLEASE NOTE – I HAVE INCREASED THE AMOUNT OF SOURDOUGH STARTER SINCE I FIRST POSTED THIS RECIPE*
500g strong white flour (Replace 150g with rye flour if you want to ring the changes, in which case add an additional 20ml water, as rye absorbs more liquid)
1 teaspoon salt
1 teaspoon sugar
150g sourdough starter
280ml (or grams – same thing) cool water
A little rice flour (or ordinary flour) for sieving
You will need a cast iron casserole or enamel roasting tin with lid (or sturdy oven-proof stainless steel saucepan with lid), lined with baking paper.
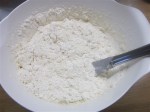
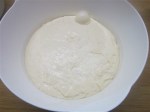
Put the flour, salt and sugar into a large mixing bowl and mix briefly.
Stand the bowl on a digital scale and add the starter and water. (If you are using mechanical scales, pour the water into the weighing pan first, then add the starter, before pouring into the mixing bowl).
Make a well in the centre of the flour mixture and pour in the water/starter. I find it easiest to start mixing the dough with a blunt table knife, just to bring the dough together. (Of course you can do this in a mixer, using the dough hook, to get the dough started, but it is still better to stretch the dough by hand as well).

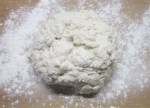
Once you have a fairly cohesive lump of dough, which will be quite sticky, tip it out onto a very lightly floured worktop. Knead for several minutes, stretching the dough as much as you can – this helps to form the lovely holey texture. Only lightly flour your hands and worktop – if you add too much extra flour, you will spoil the texture of the finished loaf.
Grease the mixing bowl (either with a pastry brush or by putting a few spots of oil in the bottom of the bowl and turning the dough around in the oil, so that all sides are very lightly greased).
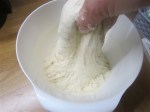
Put the dough into the greased bowl, cover with cling film and leave to rest. Over the course of the next two or three hours, leaving the dough in the bowl, knead and stretch the dough, turning the bowl as you go – repeat this two or three times during that period. (Spot the alien air bubble in the third photo below – eek).

When you have given the dough its final knead, shape it into a ball (or into a thick sausage/torpedo shape if you are using an oval casserole and want a more elongated loaf) and place it in the lined casserole/roasting tin for its final rise.
Cover with clingfilm and leave to rest until the dough is a couple of inches from the top of the tin (you need to leave some space for it to rise while baking). You can do this at room temperature, which will probably take anything from one to three hours, depending on how warm it is, or overnight in a cool room, or even in the fridge. If you rest the dough in the fridge, you may need to take it out and leave it at room temperature for an hour or more for the dough to rise to the right level.
(Please note: I have, in the past, forgotten about the dough and it had risen right out of the top of the tin. If this happens, all is not lost, simply knead the dough back to a smooth ball, then leave to rise again – it will rise more quickly the second time).
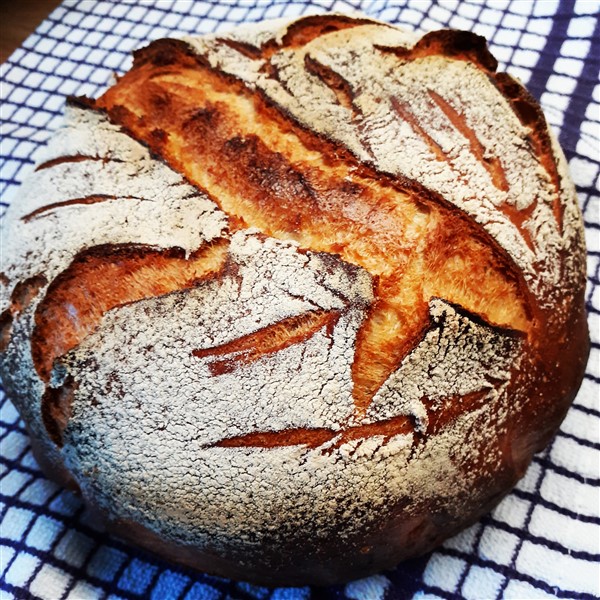
Sieve a little flour or rice flour over the top of the dough, then use the tip of a very sharp knife or razor blade (or baker’s lame if you have one) to cut a simple pattern – do this gently and try not to pull on the dough with the knife. You only need to cut down a millimetre or so – you can do some cuts slightly deeper than others, which gives an attractive effect. If you are more dexterous than I am, you can draw leaves or swirls – you will find some nice ideas here.


Heat the oven to 220ºC (fan). Once the oven is up to temperature, place the casserole/tin in the oven with the lid on. Bake for 50 minutes, then remove the lid and bake for a further five minutes. Remove the bread from the tin and leave to cool on a rack before slicing. The bread freezes beautifully – I usually slice it first, then you can remove as much as you want from the freezer each time.

Hi Jayne, this is much less faffing around than the instructions I used from an American book dedicated to the process. I guess they had to justify filling a whole book somehow. Mine wasn’t that great either, I never got the moisture level right. Will do this again. Do you have any thoughts on how gluten free flour would affect the process?
Happy new year,
Mela
LikeLike
Good morning Mela. Minimal faffing. Excellent. I really don’t think it would work with GF flour because there would be nothing to make the bread rise. You could try adding some starter to your usual GF recipe though, but with eggs/yeast. You would get the sour flavour and who knows what it would do for the texture. I have some GF flour here – next rainy day, I will give one a go and see how it turns out.
LikeLike
Ah, just realised that means I need to get a starter going with GF flour – that might well show us whether it is going to work or not. I will report back.
LikeLike
Jayne, don’t bother on my account. I’m going to make bread with corn flour today. The recipe comes from the best bread bakery in Paris, or at least the most famous. I read in a memoir that they lived on this in Paris during WWII. And found it heavy. But I’m curious.
LikeLike
I meant to comment on this earlier Jayne! But dieting got in the way! Hahaha, only joking. I am so pleased that this recipe works for you and what a BEAUTIFUL sourdough loaf too. Karen
LikeLike
Hi,
my second ever sourdough loaf is proving as we speak. Thank you for this easy to follow set of instructions. I had never made a starter or sourdough bread before, but with the starter I made following this, I have made crumpets and delicious bread, and it was very straightforward. Thank you!
LikeLike
I am so glad to know someone has found it useful. I was a bit the same – I had played with it before, but never been very successful, but this has worked brilliantly. My current starter is now six months old and getting better by the week. And it smells delicious. It’s lovely if you replace about a quarter of the flour with rye flour – you might need to add slightly more water, as the rye absorbs a bit more than the wheat flour. Really delicious.
LikeLiked by 1 person