
 I am surprised that some of my friends, many of them accomplished cooks and bakers, are afraid to bake with yeast. I find this slightly baffling and try to persuade them that now we have rapid action dry yeast, it is much like using baking powder, it just takes a little longer.
I think another reason many people shrink away from baking bread is that they think it will take up too much of their day – really, it won’t. The great thing about yeast is that it is pretty resilient as long as you keep it away from the very few things it hates – too much heat, too much salt or too much acid, so you can pretty much leave the dough to get on with things once it is mixed. Oh, and don’t feed it too much sugar or the dough will climb out of the tin and try to take over an entire floor of your house.
A friend of ours was once instructed by her cook husband to pick up some bread dough from our bakery in town (this is a seriously fantastic cheat that we get to take advantage of here – they just sell it for the same price as if it was already baked – perfect if you are baking pizzas or flat breads at home). Sue, who had no previous experience of yeast dough, decided to make this her first job of the morning, since she was in the vicinity of the bakery and had several other calls to make. Unfortunately, none of the later calls required her to look inside the boot of her car. In very warm humid conditions, and being made with our local flour, which has very lively yeasts of its own, the dough was having an absolute birthday and had grown into something that resembled one of the more scary props from Quatermass. I could easily have had a similar experience today, though at least mine wouldn’t have contained carpet hairs.
I decided about half way through the morning, on a whim, to try to recreate the ‘village bread’ that we can buy here and also the slightly different version sold in the Greek bakery across the other side of our bay in Kastellorizo. I managed to ascertain (I think) that it gets its colour and texture by being made partly with durum wheat, which gives the bread the most delicious chewy crust and a coarse crumb. It is fantastic straight out of the oven, perfect for mopping up meze and dunking into salads, and also makes amazingly crunchy toast. It’s the sort of rustic loaf that would set you back three quid in an artisan bakery back home, but you could probably make two loaves for half of that amount, even back in Blighty – one to eat now and one to slice and stash in the freezer for toast.
Unfortunately, I had totally forgotten that we had a meeting in town at lunchtime and, by the time I remembered, the dough was starting to climb out of the bowl after its first rise. With no time to bake it, I knocked back the dough, shaped it and put it on a tray underneath its plastic macintosh, chucked it into the fridge and hoped for the best.
Of course, we were ages in town – one job led to another, hubby did the most amazing Scarlet Pimpernel-style disappearing act (sans phone of course), exiting stage left, muttering about collecting glasses from the opticians – and all the while I was wondering what was happening in ‘Dough Central’ back at the house. When we eventually got home in the middle of the afternoon, I approached the fridge with some trepidation. Bingo – perfectly risen dough, but it hadn’t ‘bolted’. By the time the oven was hot, the dough was back up to room temperature, had risen just a little more and was at the perfect stage for baking. This definitely has to be put down to luck, absolutely no judgement on my part. While there is no need for you to watch the dough, I urge you not to go shoe/spectacles/kitchen unit shopping while you are waiting for it to rise.
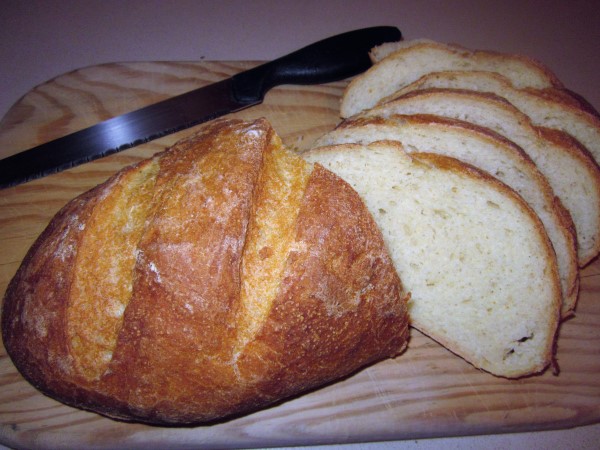
The bread has turned out perfectly – just what I had in mind. We don’t get ground durum wheat here (or not that I have discovered anyway), so I used semolina, which is basically the same thing, just not so finely ground. Because of this, my dough was slightly grainy before it was baked, but in a good way, so don’t be alarmed if your dough is not completely smooth – it looked a little as though it had cellulite, poor thing. If you are baking this in a country where you can buy perfectly smooth flour-like durum wheat, by all means go for that – I have no idea if it would be different, but I can’t imagine it will necessarily be better.
In terms of time taken, I would say it took me five minutes to mix the dough, another five to knock it back and shape it, and I needed to be around to keep an eye on it for the half an hour or so that it was in the oven, during which time I was getting on with making other useful things, like two dozen muffins to take into town this evening. This weekend heralded the end of our summer season, and the waiters and bartenders from the restaurants and bars in our favourite square have been clamouring for ‘just one more English cake before we close up and go away for the winter.’ (*sighs resignedly and gets muffin tins out AGAIN*)
Village bread (with semolina/durum wheat)
You will need two baking trays, lined with non-stick paper
500g plain flour (plus extra for kneading)
200g semolina (or you can use ground durum wheat)
1 x 7g sachet instant yeast
2 teaspoons brown sugar
1.5 teaspoons salt
300ml lukewarm water
150ml lukewarm milk
2 tablespoons oil
Put the flour, semolina (or durum wheat) into a large bowl, together with the yeast, sugar and salt. Mix thoroughly so that the yeast is well distributed throughout the mix (you don’t want the yeast coming into contact with a hefty dose of salt once the liquid is added).
Mix together the water, milk and oil, then make a well in the centre of the dry ingredients and pour in the liquid mix.


Stir with a table knife, until all the flour has been incorporated. The dough should be very sticky, but if it really is unmanageable, then add a tablespoon more flour and mix again.
Dust your work top with flour and tip the dough on to it. Knead until the dough is smooth and elastic – this should only take a couple of minutes. The dough is ready when it slowly springs back when you press it with your finger.


Put a few spots of oil in the bottom of a large bowl (at least twice as large as your dough) and turn the dough over and around in the oil – this prevents it sticking to the bowl or to the cling film. Cover the bowl with cling film and stand in a draught-free place for an hour to an hour and a half, or until approximately doubled in size.


Tip the dough back on to the work top and press down with your hands to expel the air. Cut into two, very briefly knead again, and then shape the dough roughly into two rectangles.


Roll up each rectangle like a Swiss roll, then place one on each lined tin, seam-side downwards.


Cover with oiled cling film and leave to rise for half an hour to 40 minutes until the dough is well risen and almost doubled in size.
Pre-heat the oven to 230°C and place a roasting tin in the bottom of the oven to heat up. Put the kettle on to boil.
Carefully remove the cling film from the loaves and then use a very sharp knife or razor blade to gently slash the dough two or three times, cutting down around 5mm (be careful when doing this, so that you don’t squash the dough and expel the air).

Put the loaves into the pre-heated oven and pour a kettle of boiling water into the heated roasting tin that you earlier placed in the oven (this creates steam which will give you a beautiful crust).
Bake for five minutes, then reduce the heat to 200°C and bake for 25 minutes. Turn the loaves over and bake for a further five minutes, bottom side upwards. The bottom of the loaf should feel hollow when you tap it with your knuckle. If you are in any doubt, give it another five minutes. The bread should be a really deep golden brown and the crust should be shiny and hard.
Remove from the oven and place on a wire rack to cool.
If you don’t want to use the bread immediately, once it is completely cold you can slice it and freeze it. (This removes the temptation to eat the entire loaf in one go…)

